Add and Customize CSS Code in Squarespace Editor: Complete Guide
To access and use Squarespace's CSS Editor for custom styling:
The CSS Editor allows you to apply custom styling beyond Squarespace's built-in options. Use it specifically for modifying fonts, colors, and backgrounds to avoid potential site damage.
Key Limitations:
- Custom CSS doesn't transfer when switching templates in version 7.0
- Code must pass the built-in syntax checker
- Some browsers may handle CSS differently
Adding Custom CSS:
- Open the custom CSS panel
- Click "Open in new window" for a larger view
- Add your code
- Click Save to publish changes
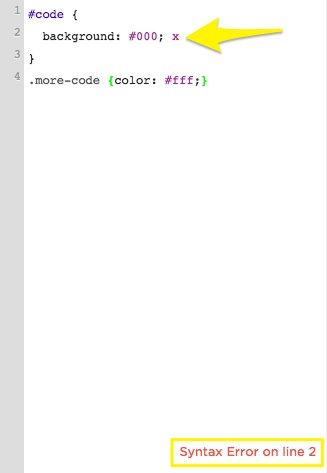
The editor displays line numbers and syntax errors in red at the bottom.
JavaScript error message
Working with Custom Files:
- Click "Custom Files" in the CSS Editor
- Upload files by clicking "Add images or fonts" or drag and drop
Supported File Types:
- Images: .jpg, .png, .gif
- Fonts: .ttf, .otf, .woff
- Note: .svg files are not supported
Using Custom Files in CSS:
- Write your code up to where you need the file URL
- Place cursor at the URL insertion point
- Click the uploaded file to auto-insert its URL
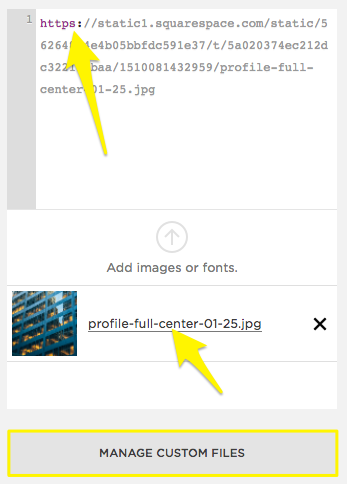
Arrow pointing to file name
SSL Compatibility: If you change SSL settings, update file URLs accordingly:
- Open CSS Editor
- Click Manage Custom Files
- Click the file
- Update URL protocol (http/https)
- Save changes
Best Practices:
- Review code recommendations in FAQ
- Ensure proper formatting
- Test across different browsers
- Consider hiring a Squarespace Expert for complex customizations
Related Articles

How to Set Up a Third-Party Subdomain on Squarespace: Step-by-Step Guide