
How to Use Squarespace CSS Editor: A Complete Guide for Custom Styling
Custom CSS allows you to extend Squarespace's styling capabilities by modifying fonts, colors, and backgrounds. Add CSS code carefully to avoid potential site issues.
Adding CSS Code:
- Open the Custom CSS panel
- Click "Open in New Window" for an expandable editor
- Add your custom CSS code
- Click Save to apply changes
The editor displays line numbers for easy reference and highlights syntax errors in red.
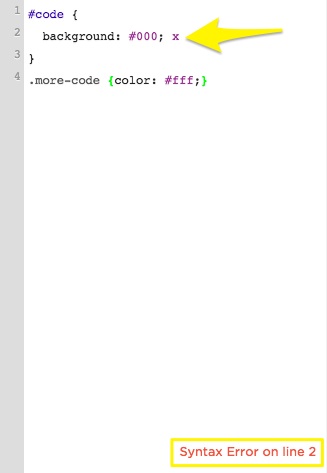
Code syntax error in editor
Uploading Custom Files:
- Click "Custom Files" (or "Manage Custom Files" in v7.0)
- Upload by clicking "Add images or fonts" or drag files
- Supported formats:
- Images: .jpg, .png, .gif
- Fonts: .ttf, .otf, .woff Note: .svg files are not supported
Using Custom Files:
- Write your CSS code up to where you need the file URL
- Place cursor at the desired location
- Click the uploaded file to automatically insert its URL

Yellow arrows indicate text field
Important SSL Considerations:
- File URLs match your site's SSL settings
- When enabling SSL:
- Open CSS Editor
- Click Manage Custom Files
- Click the file
- Update URL to start with https
- Save changes
Key Limitations:
- CSS should only modify fonts, colors, and backgrounds
- In v7.0, Custom CSS doesn't transfer between templates
- Built-in parser flags potential browser compatibility issues
- Code must pass syntax validation
For additional support:
- Review the Custom code FAQ
- Visit the Squarespace Forum
- Consider hiring a Squarespace Expert
- Explore premium/enterprise plans for advanced customization
Related Articles

Top 10 Ways to Preview Your Squarespace Website Content Before Publishing