How to Add Google reCAPTCHA to Protect Your Forms from Spam and Malware
Google reCAPTCHA protects your forms from spam by automatically verifying if submissions are from real humans. It works with Form blocks, Newsletter blocks, promotional pop-ups, and product waitlists.
Most sites use reCAPTCHA v3, which runs invisibly without requiring user interaction. Cover pages use reCAPTCHA v2, which needs a Google account and checkbox verification.
Enabling reCAPTCHA
Form Blocks:
- Edit page and click the Form block's pencil icon
- Go to Storage tab
- Click Google reCAPTCHA
- Enable the option
Newsletter Blocks:
- Edit page and click the block's pencil icon
- Go to Storage tab
- Connect Squarespace storage if needed
- Enable Google reCAPTCHA
Promotional Pop-ups:
- Open pop-up panel and click Action
- Choose "Subscribe to a newsletter"
- Enable reCAPTCHA under Verification
Product waitlists have reCAPTCHA enabled by default.
Cover Page Setup (Version 7.0)
- Access Development tools
- Go to External API keys
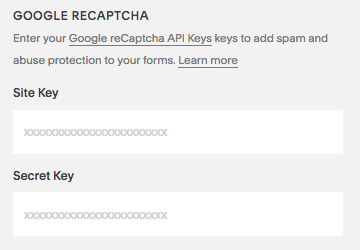
- Get Google reCAPTCHA API keys
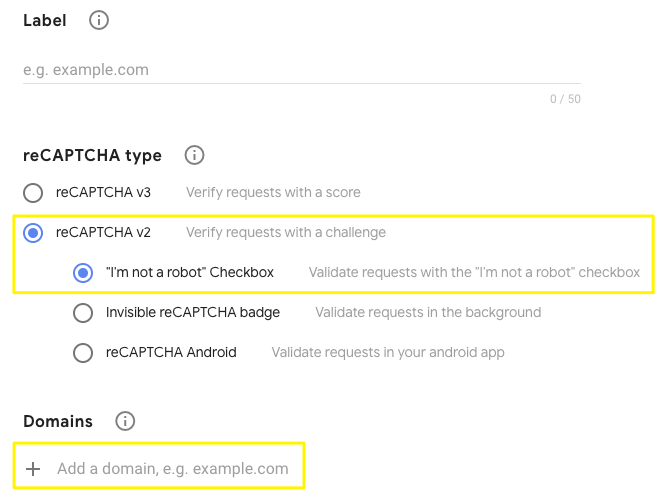
- Choose reCAPTCHA V2
- Add all your domains (default and custom)

Checkbox "I'm not a robot"

Site key

reCAPTCHA API keys page
Troubleshooting
Common errors:
- Invalid domain: Add all domain names
- Invalid key type: Use reCAPTCHA V2 for cover pages
- Unable to submit: Check for extra characters in Secret key
- iOS redirect: Known limitation when checking reCAPTCHA box
Remember to update reCAPTCHA settings when changing domains. Changes may take up to 30 minutes to take effect.
Related Articles

How to Set Up a Third-Party Subdomain on Squarespace: Step-by-Step Guide

